Sunday, January 27, 2013
Gameplay Chapter 1: What Is Vanguard? [And How Do I Play It?]
In its simplest essence, Cardfight!! Vanguard is a TCG. Like any other TCG, this game has rules and strategy that test your wit and your ability to understand yourself and your opponent. Unlike a lot of other games, however, Cardfight!! Vanguard has heart. I know, it sounds super dorky, but it's true! I've never seen players go so fiercely at a card game as they have Vanguard. I should know. I've played almost all of them. I personally attribute the "heart" of Vanguard to its TV show of the same name, Cardfight!! Vanguard.
Cardfight!! Vanguard has an accompanying manga and anime, like most Japanese Card Games. The unique thing here is that Vanguard's anime is 100% accurate. The hero has good luck. And bad luck. The cards he plays are actual cards you can play in the game. It isn't like most game-related anime (Yu-Gi-Oh!, Beyblade, Duel Masters) that have magical, fantastical things happening all the time that you know you'll never be able to achieve. Cardifght!! Vanguard doesn't open up and say "This game is the root of all civilization!" it says "This is a collectible card game. We use our imagination to make it real to us." Which makes it very easy for Vanguard players to do the same. Big imagination usually translates into a lot of fun.
I hear you say, that's great, disembodied blogger, but what is Cardfight!! Vanguard?
Well, the anime explains a lot of it. Imagine you are on a planet very much like earth. There are very few cities and nature is rampant. This planet is called Cray. And this is where you cardfight. Now imagine that you are leading an army to war. Your army has fifty soldiers. This is your deck. These soldiers will help you to defeat an opposing army. When you begin a game, you choose a lowly Grade 0 Soldier. This will be your body on Cray, and the Vanguard of your deck. Since you are only visiting Cray in spirit, you can only fight by doing two things: Riding, and Calling.
What are those, you ask?
Well Riding is the act of making your Chosen Vanguard stronger, and increasing his Grade (Level) until he is a mighty Level 3. We'll get to more on how to do that later. Calling, however, is the act of summoning a soldier to your field to help you fight. Warriors are proud, however, so you can only Call units that are as strong as yourself, or weaker.
Whoa! That was an intense trip! I can see you are already going to be a powerful cardfighter! Okay, come back from Cray, and we'll teach you how to play proper.
RECAP-- Make sure you understand these terms:
Vanguard
Ride
Call
-- If you don't, re-read this chapter, or see the Glossary for details.
Gameplay Chapter 2: Units, Rides, and Symbols
Now, if you are just starting to play the game, this will work best with a Trial Deck (Starter Deck) in front of you. But don't worry! I will provide pictures as well to help those of you who don't have decks yet! I'll be mostly using "Trial Deck 1: Blaster Blade" for this example.
If you look through your deck, you'll notice there are ZERO "magic cards" or "instants" or "spells." Like I said, Vanguard is all about you and your army. Instead, all 50 cards are called "Units." Units have special abilities that make you stronger and create synergy in certain deck builds.
Here are examples of a few units:

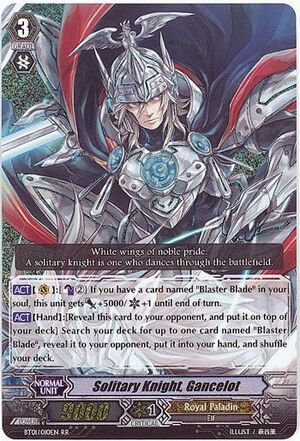

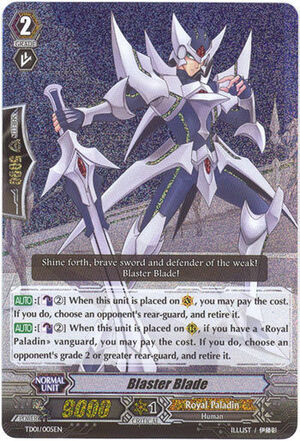
You'll notice a few things about each unit. First, check the top left corner. We'll see here each unit is marked by a number (0 to 3). Remember those Grades we mentioned earlier? Here they are. You could conceivably ride this exact line-up in a match. Every turn, right after you draw, you would place a card one grade higher than your own right on top of the weaker card (Ride Phase). Eventually you will have a tidy stack of cards underneath your Vanguard, representing all your previous forms. Keep close eye on this stack, as some cards make use of what you put in there!
Now, every Unit that isn't your vanguard is called a Rearguard. Rearguards do not ride to grow stronger. You simply replace them or move them. There are five Rearguard positions. Two Rearguards join your Vanguard on the Front Row. These cards can issue attacks on your opponent's Vanguard or his Front Row. That means cards on the front row are in danger of being destroyed, so make sure you put cards that need to stay safe on the Back Row. These three spaces are directly behind your Front Row, and cannot normally be attacked by enemies. There ARE units that hurt what is back there, though, so be careful when you play a clan who does that. Cards intended for the back row usually have very low power, or have key abilities you'd like to use. Do know that a card on the Back Row can change places with the card DIRECTLY IN FRONT OF IT on the Front Row during any Main Phase. The Main Phase starts as soon as you Ride a card, and ends when you start attacking. So as long you haven't attacked, these cards can switch back and forth. They may not move side to side, and no card can change places with your Vanguard.
Now that you've played a bunch of Rearguards, the second thing you'll notice is directly beneath the grade. Grade 1's and 0's have a forward arrow. Grade 2's have a slanted arrow. Grade 3's have a double-helix arrow.
The forward arrow means Boost. A card played in the Back Row can lend its power to a card directly in front of it. This is called Boosting, and increases the power of the card in front of it for one single attack.
The slanted arrow means Intercept. We'll get to guarding in detail later, but intercept means that a card in the Front Row can jump in front of your Vanguard and protect him from an attack. They do this by using the Shield Value found down the left edge of the card. You subtract this Shield Value from the incoming attack power, hoping to make it weak enough so your Vanguard does not get hurt and take Damage.
Finally, the Double-Helix Arrow. This ability only works when a card is your Vanguard. Normally when your Vanguard attacks, you check the top card of your deck to see if you gain any extra power or effects (See Chapter 4 for details). This is called a Drive Check. Well the Double-Helix Arrow means Twin Drive Check. So instead of a single card, you check the top two cards.
That's it for the top left of the card. Down along the bottom you'll see the card's Name, Power, Clan, and Sub-Class. These are mostly self explanatory. The Clan of all these cards is Royal Paladin. The sub-class is underneath the clan name. It is a smart idea to keep every card in your deck of the same clan, until you get a better grip of the game. Then you may start blending clans and experimenting. It usually doesn't end well, but can sometimes work.
RECAP
-- Make sure you know these terms:
Vanguard
Rearguard
Front Row
Back Row
Boost
Intercept
Drive Check
Twin Drive
-- If you don't, re-read the chapter, or see the glossary for more details.
Gameplay Chapter 3: Skills
Finally, the part you've probably been waiting for. Skills and Abilities! You'll notice "Epona" and "Marron" above have no skills. This is common of Low-Grade cards. A card with no skills is usually referred to as a "Vanilla" card. But take a gander at "Blaster Blade" and "Gancelot." They have skills. To better explain skills, I'm going to use a card that is NOT in your Trial Deck, but is a great addition to any Royal Paladin deck using Blaster Blade: "Exculpate the Blaster."

I went ahead and found the only current English image of him to make it easier to understand. I chose this card because there are three types of abilities, and he has at least one of each.
CONT: Short for Continuous, these abilities exist 100% of the time, unless they say otherwise. They are symbolized by a red square. Exculpate's CONT ability? "If you do not have a Grade 3 <<Royal Paladin>> Vanguard, you cannot normal ride this card." and "If you do not have a "Blaster Blade" in soul, this card cannot attack." These abilities are always active, no matter whose turn it is. Some other CONT abilities may include:
-- "During your turn, this unit gains +1000 Power for every <<Dark Irregular>> in your soul"
-- "If 'Insert Card Name' is in the soul, this card gains +1000 Power"
Notice how a lot of CONT abilities mention the "soul." Remember that stack of cards under your Vanguard? You got it! That's a soul. Think of it as the soul of every creature you've turned into to become your current form, if that helps.
AUTO: Short for Automatic, these are abilities that trigger as soon as a condition is met. Most of them are not optional. Sometimes they are good, other times they may be bad. For Exculpate? His AUTO abilities read "When this unit is placed on RearGuard, retire this unit," "When this unit attacks, put all cards in your soul except "Blaster Blade" into the Drop Zone. This unit gains +2000 Power for every card put into the Drop Zone by this effect until the end of turn." and finally "At the end of a battle in which this card attacked, search your Drop Zone or your Soul and ride a "Blaster Blade" in Rest Position. Then put all cards in your soul into the Drop Zone."
Okay, these abilities threw a bunch of new symbols at you, which I've translated above. The Drop Zone is your graveyard or discard pile, simple. A Sword with a number after it usually means Power +(or -) Some amount. Lastly, that sideways card means "Rest Position." It also means Tapped, for those who play Magic or Kaijudo. For my Yugioh converts, it is the same orientation as "Face-Up Defense Mode." A card must be in "rest" after it attacks...so that it can rest. See? Logical names here!
Now, as you saw, none of those abilities were optional. When you completed the condition of "Declaring an attack" the effect just happens. Even if you forget to say these abilities out loud, they are Automatic, and cannot miss timing in any way. They will happen. Other popular AUTO effects are:
-- "At the start of your Main Phase, Soulcharge 1. This unit gains +2000 power until the end of the turn."
-- "When this unit attacks a Vanguard, this unit gains +3000 Power until the end of the battle."
"What is soulcharging!?" you ask? Well, it is the act of taking the top card of your deck and placing it directly into your soul. You can only soulcharge if a card tells you to. Some decks are built around soulcharging.
ACT: The last type of ability, ACT, stands for Action. These are abilities you must choose to use or not use. They usually have pretty hefty costs to use, and all ACT abilities MUST BE USED BEFORE YOU START ATTACKING. So take great care to see what abilities use act, and which ones don't. Exculpate's act is "Counterblast 3, this unit battles all of your opponent's units in one attack."
"Whoa whoa, hold the phone! What is a Counterblast?" A mechanic exclusive to Vanguard, I reply! You see, in vanguard the goal is to not take Damage, because that means you will come closer to losing. A player who takes 6 Damage loses. However, damage can be "spent" like mana in order to activate powerful abilities. This is indicated by a blue card being flipped over, then a number. The spending of your damage is called Counterblasting. You are "Countering" your enemy's damage by "blasting" them with powerful effects. When you counterblast a card, you flip it facedown. These cards don't unflip unless something tells them to, which means you only get to use 5 counterblasts in a whole game. Spend them wisely.
The last thing you need to know about is a Soulblast. Some ACT abilities use this mechanic to pay costs for their abilities. Mixing Soulblasts and Counterblasts will allow you to use a lot of powerful effects. Soulblasting is exactly what it sounds like. You blast a card out of your soul. Cards that are soulblasted are sent to the Drop Zone. This is indicated on the card by a blue card with a "V" on it, and cards poking out from underneath it. Then it is followed by a number to show how many to blast. To wrap up this segment, here are three cards (not in the trial deck) that show off "Soulcharging" "Soulblasting" and "Counterblasting":
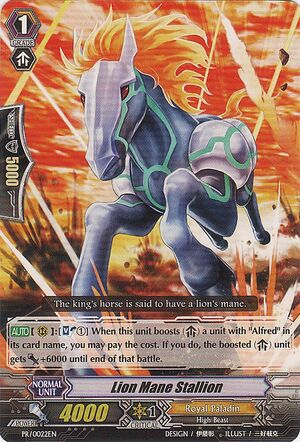
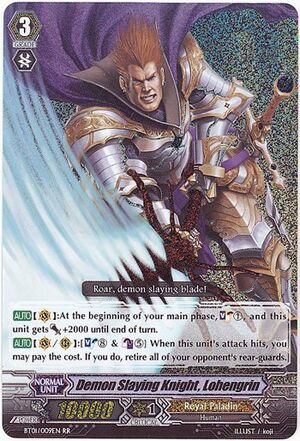

RECAP
-- Terms you need to know:
Drop Zone
Soul
CONT
AUTO
ACT
Rest Position
Soulcharge
Counterblast
Soulblast
-- If you don't, re-read this chapter, or check the Glossary for more details.
Gameplay Chapter 4: Triggers
At this point, you now know nearly enough to start laying out a game and learning about phases.
"Excellent!" You shout. "I'll make 'Bringer of Good Luck Epona' my Starting Vanguard then!"
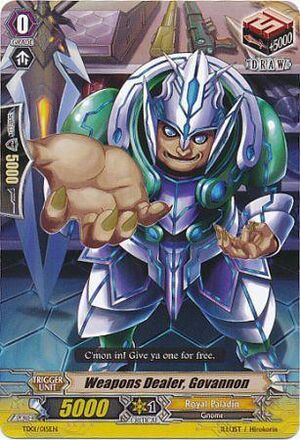
Whoa there. A little too hasty. Look at Epona's top right corner. Notice how it has a fancy symbol in there. Can you read it? It says "Critical." This means Epona is what we call a trigger. Triggers can be revealed at two and ONLY two times in a game: When your Vanguard Attacks (Drive Check) and when you Take Damage (Damage Check). There are four types of triggers:
.jpg/300px-BT01-046EN_C_(2).jpg)
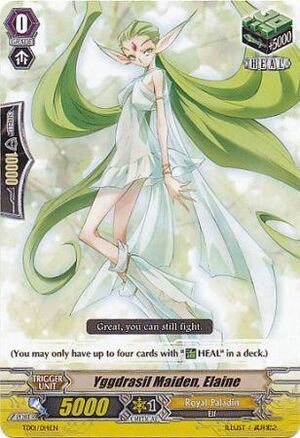
The four trigger types are (in no particular order): Draw, Stand, Heal, and Critical.
Draw: The first trigger type is a Draw Trigger. When revealed as part of a Drive Check or as Damage, you may give +5000 Power to any one unit until the end of the turn, and you may draw one card. This power lasts until the end of the turn. Note that Draw triggers have the least shield, and thus cannot guard for much, but they have one of the most powerful abilities in the game: Drawing Cards.
Stand: The Second trigger is a Stand Trigger. When revealed in a Drive Check or Damage Check, this card will give +5000 Power to one unit until the turn ends, and will allow you to Stand a unit in the Rest Position (AKA, somebody who already attacked). These effects can both go to one unit, or can go to two different units.
Heal: The Third trigger is the Heal Trigger. The most powerful trigger, you can only have 4 Heal Triggers in any deck. When properly revealed, a Heal Trigger will heal one Damage you have taken, but ONLY if you have equal or more damage than your opponent. It will also grant +5000 Power to one unit on your field until the turn ends.
Critical: The Fourth trigger is the Critical Trigger. This one is the crowd favorite. Normally when you hit a Vanguard, you deal 1 Damage. But if you reveal a Critical Trigger, you will deal 2 Damage instead of 1, AND you can give one unit on the field +5000 power until the turn ends. These effects can go to any units on field, and do not have to go to the same unit. With only 6 Damage to win, dealing two in a single attack is a big deal.
Now, like we mentioned earlier, Triggers can only activate during Drive Checks and Damage Checks.
Drive Check: When your Vanguard declares an attack, after your opponent chooses whether or not to guard, reveal the top card of your deck. If it possesses a Trigger, apply the trigger effects to all cards they apply to. AFTER THE TRIGGER EFFECTS HAVE BEEN APPLIED/NOT if your Vanguard has Twin Drive!! (the double helix arrows) you can check the next card, and give out any effects it may give you. This is very important to way the game is balanced. So perform them in the right order! Card that are revealed in the Drive Check are added to your hand.
Damage Check: When an opponent successfully attacks you, you reveal the top card of your deck. This card is your Damage. If that card has a Trigger, you may then give its effects to any applicable card on the field. Most people give all the power to the Vanguard, since it makes guarding easier. Repeat this process for any extra damage you might have been dealt. Cards revealed during the Damage Check are placed in the Damage Zone.
And that is it about triggers! For the basics anyway. You'll see some more advanced Trigger Advice later down the road. They are powerful little buggers who can turn a lost cause into a victorious turn! They are a tiny nugget of randomness that helps to ensure no deck is truly "unbeatable." Any deck can have bad luck pulling triggers, and thus any deck can be beaten.
But with Knowledge on Units, Riding, Skills, and Triggers, you are just about ready to play! The game really is that simple, when you think about it. There is only one last thing to cover!
RECAP
-- Terms you need to know:
Draw Trigger
Stand Trigger
Critical Trigger
Heal Trigger
Drive Check
Damage Check
-- If you don't, re-read this chapter, or check the Glossary for more details.
Gameplay Chapter 5: Phases and Timing
Like any game, the most complicated part of the rules isn't the cards or how to win. It's all about phases and timing things out. Well, congrats! You've found a card game that is perhaps the simplest in the world when it comes to timing and phases! In fact, if you paid close attention to the previous gameplay chapters, then you might be surprised to find all of this sounds very familiar! AUTHORS NOTE: For clarity, I may have subdivided or renamed phases, but I have not changed their order or how they impact abilities or turns.
Phase 1: STANDby Phase
-- Actually called the Stand Phase, it is simple. If you have any units in the Rest Position, you Stand them (unless a card says otherwise) back up right before your turn officially begins. MOST players usually verbalize this with "Stand and..."
Phase 2: Draw Phase
-- "...Draw." You draw a card for your turn. If at any point this causes you to have zero cards in your deck, you lose. Instantly. You do not get a chance to finish the turn or anything.
Phase 3: Ride Phase
-- During this phase you have two choices. Ride to a new Grade (or another card of the same Grade) or do not ride. You cannot ride to a lower grade during this phase. After you ride (or not) you move to...
Phase 4: Main Phase
-- This is the second most important phase! During this phase, you can:
- Use any abilities that are of type ACT. You can choose whether or not to activate any act abilities here.
- As of right now, there are no counter abilities. If you have the cost to activate an ability, it will succeed, and no unit can miss the timing for its effect. Even if you have twelve abilities that all say "At the start of your main phase..." they can all activate.
- The only time this is NOT TRUE is if a card was not on the field "At the start of the main phase," but somehow hits the field by another card's ability.
- All cards must be on the field in order for their effects to resolve. If a card leaves the field, it effect goes with it, unless it says otherwise (if a card's effect makes it jump into the deck to pay for it, this counts as "saying otherwise").
- You may also "Call" (Summon) any number of rearguards you'd like, as long as they are of equal or lower grade than your Vanguard.
- You MAY summon a unit into an occupied Rearguard Circle (Slot, Monster Zone, etc.). Doing so kills whatever was already in that spot and sends it to the Drop Zone (Graveyard).
- You may swap the field locations of any two of your own rearguards, as long as they are DIRECTLY IN FRONT OF EACH OTHER. Again, no moving sideways, and nobody can switch with the Vanguard unless a card tells you otherwise.
-- When you finish with all your abilities and calls, you can begin to battle!
Phase 5: Battle Phase
-- Here's how battles work:
Phase 5: Battle Phase
-- Here's how battles work:
- A card declares an attack by tapping itself and choosing a target. A booster directly behind it can declare its intent to boost, and also taps. This is called "Starting a Battle." Take care not to confuse "a Battle" with "The Battle Phase"
- A unit may target the Vanguard, and attempt to deal damage, or they may attack a Rearguard on the opponent's Front Row, and attempt to send that Rearguard to the Drop Zone.
- At this point, any abilities that activate "When a card declares an attack" can be activated. These are usually AUTO type abilities, and will activate on their own.
- Now the opponent chooses either to Guard or Not Guard.
DETOUR FOR A LESSON ABOUT GUARDING!
Guarding. It makes up the foundation of the game. It is very simple. On the left hand side of all cards, there is a number. This number is either 5,000 or 10,000. When an opponent attacks, you can throw down as many cards from your hand as you freaking want to in order to guard. You can also Intercept with Grade 2 units (remember Chapter 2) on your field. Imagine all those numbers building a giant shield. Throw down a 5,000 and two 10,000's? That's 25,000 Guard. Subtract this number from the unit who is attacking you. If they are now weaker than their target, you just guarded successfully. Any card you guard with goes to the Drop Zone when it is finished with that attack. Not the whole turn. One attack. So be careful, because you can run out of guards very quickly.
NOW BACK TO THE BATTLE PHASE!
- After the opponent drops their Guard, if you are a VANGUARD, you proceed to enter a Drive Check. Check for any triggers, apply any that you get, and then place Checked cards into your hand.
- If you are not a Vanguard, then you either succeed or fail. A failure does NOT cause your attackers to die. They simply fail to do any damage.
- If revealing cards in your Drive Check reduces your deck to 0 cards, you lose immediately, EVEN if the last card is a trigger that would have won you the game. The same occurs if your second to last card is a Draw Trigger, and it forces you to draw your final card.
- The power of the booster is technically applied. Earlier it merely declared its intent. This means you CAN give trigger abilities to a booster mid-attack, and it WILL obtain those powers in time to hit something.
- You either hit the target, or fail to hit the target. If you hit the target, the opponent performs a Damage Check and applies any triggers they may find (if the target was the Vanguard) or they send the targeted unit to the Drop Zone (if the target was a Rearguard).
- If the Damage Check reveals a Heal Trigger, its conditions to activate must be valid BEFORE it hits the Damage Zone. If they are, it heals a damage before going to the Damage Zone. (So if the 6th Damage is a Heal Trigger, you do NOT lose).
- If the Damage Check reduces the number of cards in a player's deck to 0, they lose immediately, even if they have sustained no damage whatsoever. The same is true if their second to last card is a Draw Trigger, and they are forced to draw their last card.
- If the Opponent places a 6th card in their Damage Zone, they lose and the match ends.
- Once you either hit or fail, any abilities that activate "When this unit's attack hits..." or "When an attack hits during the battle this unit successfully boosted" can be executed. If any conflict arises due to Damage Checks, "On-hit" abilities and the Damage Check happen simultaneously, so that nothing misses the timing.
- If these abilities call new units to the field, they appear in a Standing Position unless they are told to do otherwise. At this point, if that unit has an ability that activates "When this unit is placed on Vanguard or Rearguard," it DOES activate. Remember, nothing misses the timing here. So do what it says to do.
- After all abilities have resolved, if you still have units standing, even if they just appeared, you may proceed to begin a new "Battle" by resting (tapping) another Standing Unit.
- After all units that you WISH to battle have battled (a unit does not have to battle), you may declare your battle phase ended.
Phase 6: End Phase
-- If you have any abilities that activate "During the End Phase..." you may use them now. Otherwise, your turn is now over. Your opponent's turn now begins, starting with the Stand Phase.
There you have it! Six simple phases. Nothing misses the timing. You, my friend, are ready to play!

No comments:
Post a Comment